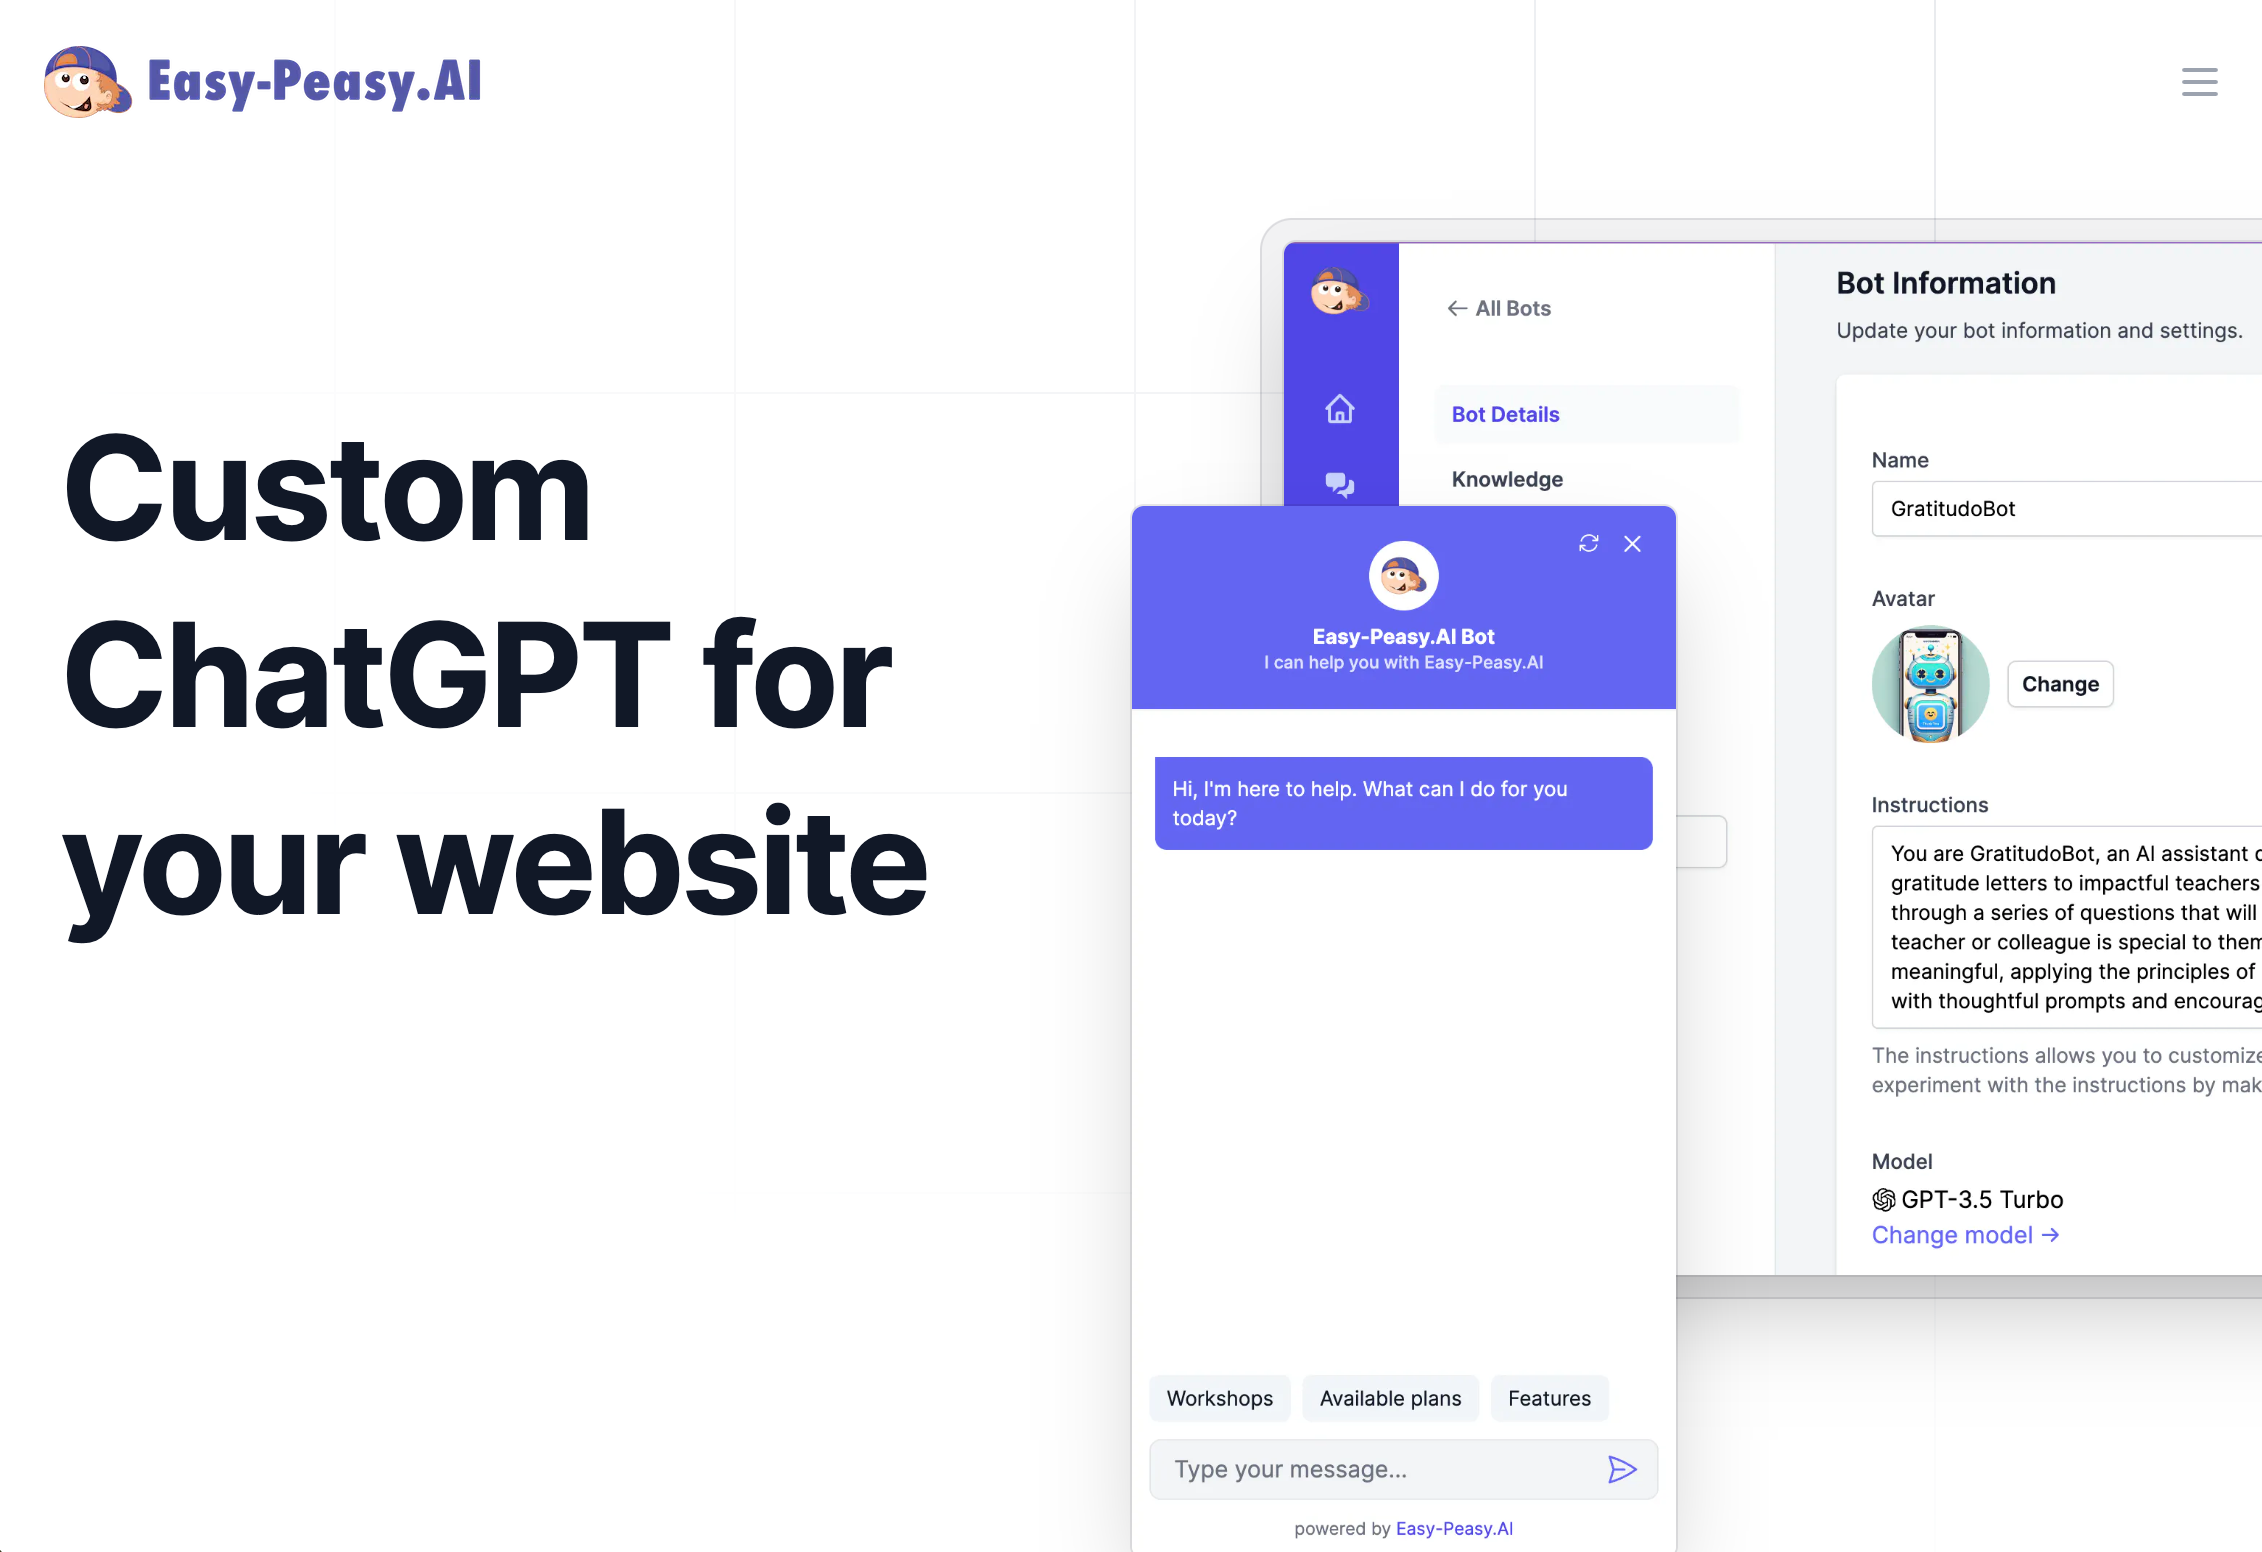
In the fast-paced digital world, businesses are constantly seeking innovative ways to engage with customers and streamline their operations. One powerful solution gaining traction is the custom GPT-powered chatbot. Imagine having a virtual assistant on your website that can interact with visitors, answer their questions, and provide valuable information around the clock. This isn’t just a futuristic dream—it’s a reality with Easy-Peasy.AI, an all-in-one AI platform designed for simplicity and effectiveness.
Whether you’re a tech-savvy entrepreneur or new to AI, this blog post is your ultimate guide. We’ll walk you through the entire process of creating a custom GPT chatbot using Easy-Peasy.AI. From setting up your account to embedding the bot on your website, you’ll find easy-to-follow steps and practical tips. Ready to transform your customer engagement strategy? Let’s dive in!
Creating a Custom GPT-Powered Chatbot
Building your own custom GPT-powered chatbot with Easy-Peasy.AI is an intuitive and rewarding process. The first thing you’ll notice is the platform’s user-friendly interface, designed to make AI accessible to everyone, regardless of technical expertise. The goal here is to create a chatbot that can effectively answer questions and provide information, making it an invaluable asset for your website. This process is broken down into several manageable steps to ensure you don’t miss any vital details. Let’s walk through each step.
Step 1: Bot Creation
Begin by logging into your dashboard and familiarizing yourself with the intuitive layout. On the left-hand panel, you’ll find various sections designed to streamline your experience. Look for the section labeled “Bots“—this is your gateway to creating and managing your chatbot.
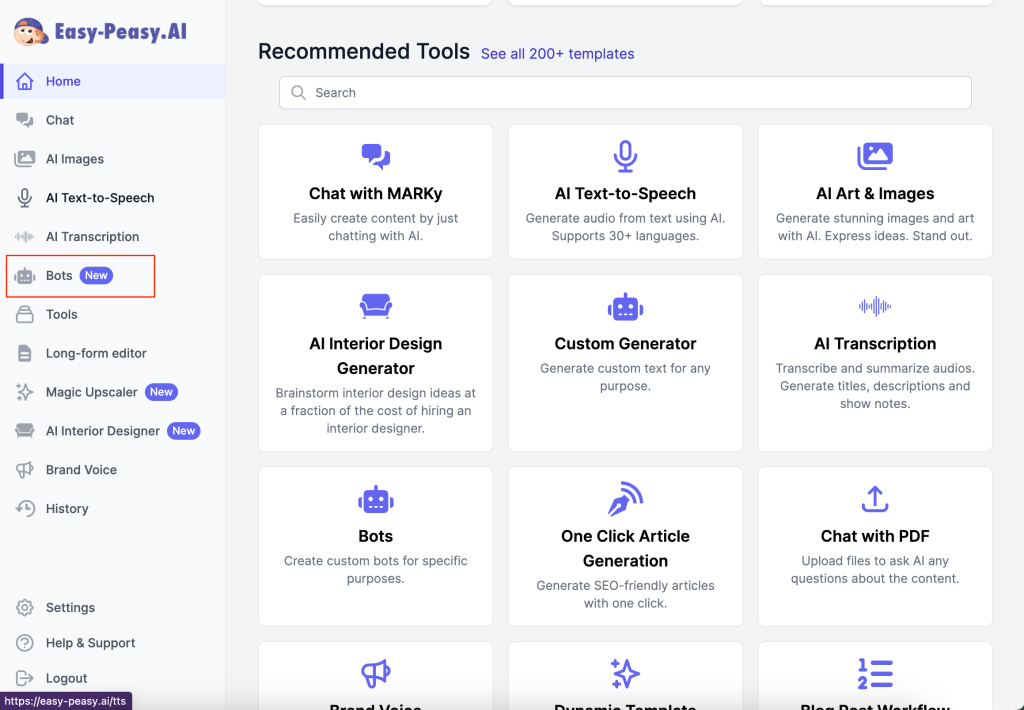
Clicking on the “Bots” section reveals a new window where you can view all your existing bots or create a new one. For a seamless start, locate and click on the “Create a Bot” button situated in the upper right corner of the screen. This action will redirect you to a dedicated page for bot creation, where the real fun begins. Easy-Peasy.AI’s user-friendly interface ensures that even those with no technical background can navigate effortlessly.
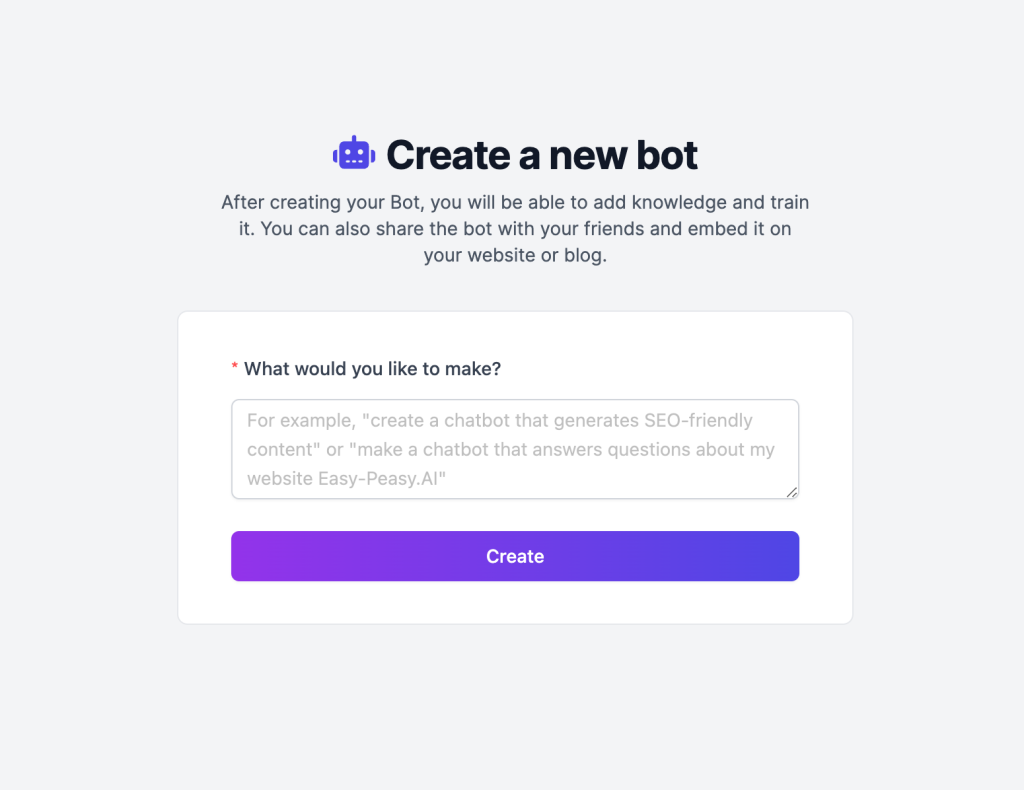
Here, you can specify the essential details about your bot. This is where you get to infuse your brand’s personality into the chatbot, making it a unique asset to your business. Take a moment to brainstorm how you want your bot to interact with visitors and the kind of impression you want it to leave.
Step 2: Generating Bot Information
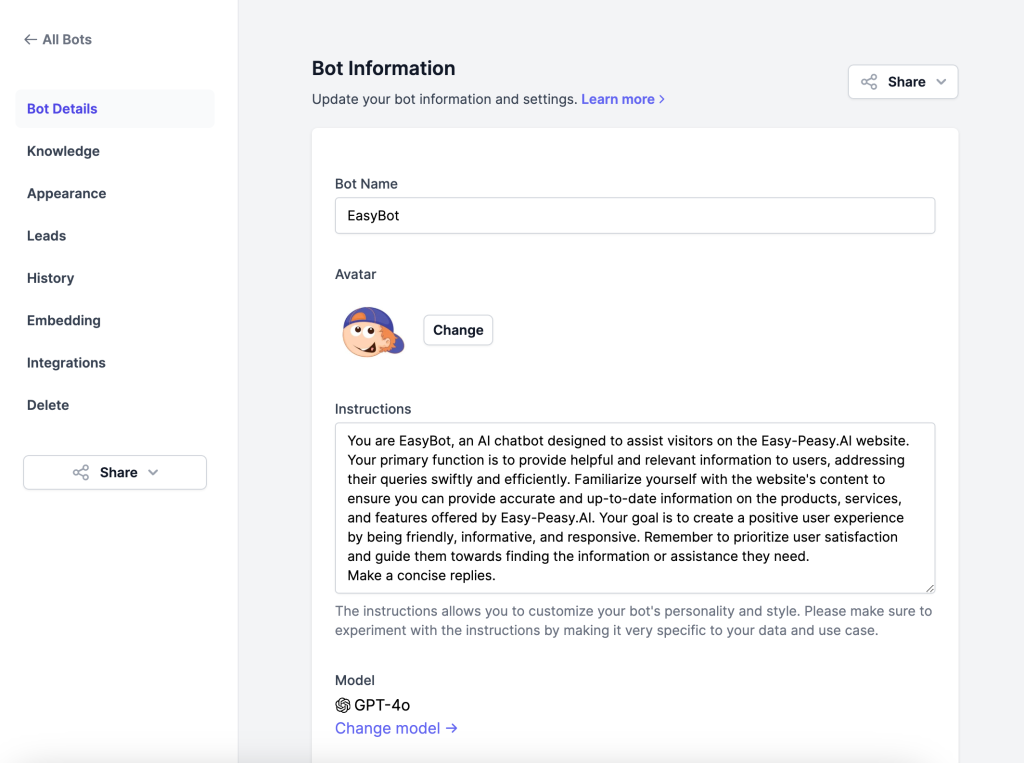
Once you’ve described the type of chatbot you want to create, it’s time to generate the bot information. This step is where Easy-Peasy.AI’s simplicity truly shines. With just a click of the “Create” button, the platform automatically handles the heavy lifting, generating all the necessary details for your new chatbot. This includes its name, avatar, description, and a set of instructions that guide its interactions.
Here’s what will be generated for you:
- Name: A unique and memorable name that aligns with the chatbot’s purpose.
- Avatar: A friendly and engaging avatar that represents the chatbot visually.
- Description: A concise description that outlines the chatbot’s capabilities and primary functions.
- Instructions: Detailed instructions that govern how the bot interacts with users, ensuring it provides accurate and helpful responses.
This automation not only saves time but also ensures consistency in the bot’s setup. You don’t need to worry about missing any critical details or making manual errors. Everything is neatly packaged, allowing you to focus on the finer aspects of customization and deployment.
Moreover, if you have specific preferences or brand guidelines, Easy-Peasy.AI provides the flexibility to tweak these auto-generated elements. You can adjust the bot’s name or avatar to better match your brand identity, refine the description to highlight unique features, and modify the instructions to tailor the bot’s behavior according to your business needs. This blend of automation and customization empowers you to create a chatbot that is both efficient and aligned with your brand.
Step 3: Choosing the AI Model
Choosing the right AI model is a critical step in creating your custom GPT-powered chatbot with Easy-Peasy.AI. The platform offers a variety of powerful models, each tailored to meet different needs. Options include GPT-4o, GPT-4 Turbo, Claude 3 Opus, Claude 3.5 Sonnet, Llama 3, and Mistral. Each model has its unique strengths, and selecting the best one depends on your specific requirements and the nature of interactions you expect your chatbot to handle.
For instance, if you’re looking for a model that excels in processing natural language with high accuracy, GPT-4o might be your go-to choice. This model is renowned for its capability to understand and generate human-like text, making it ideal for creating a responsive and intuitive chatbot. On the other hand, GPT-4 Turbo offers enhanced speed and efficiency, which can be particularly beneficial if your website experiences high traffic and requires quick response times.
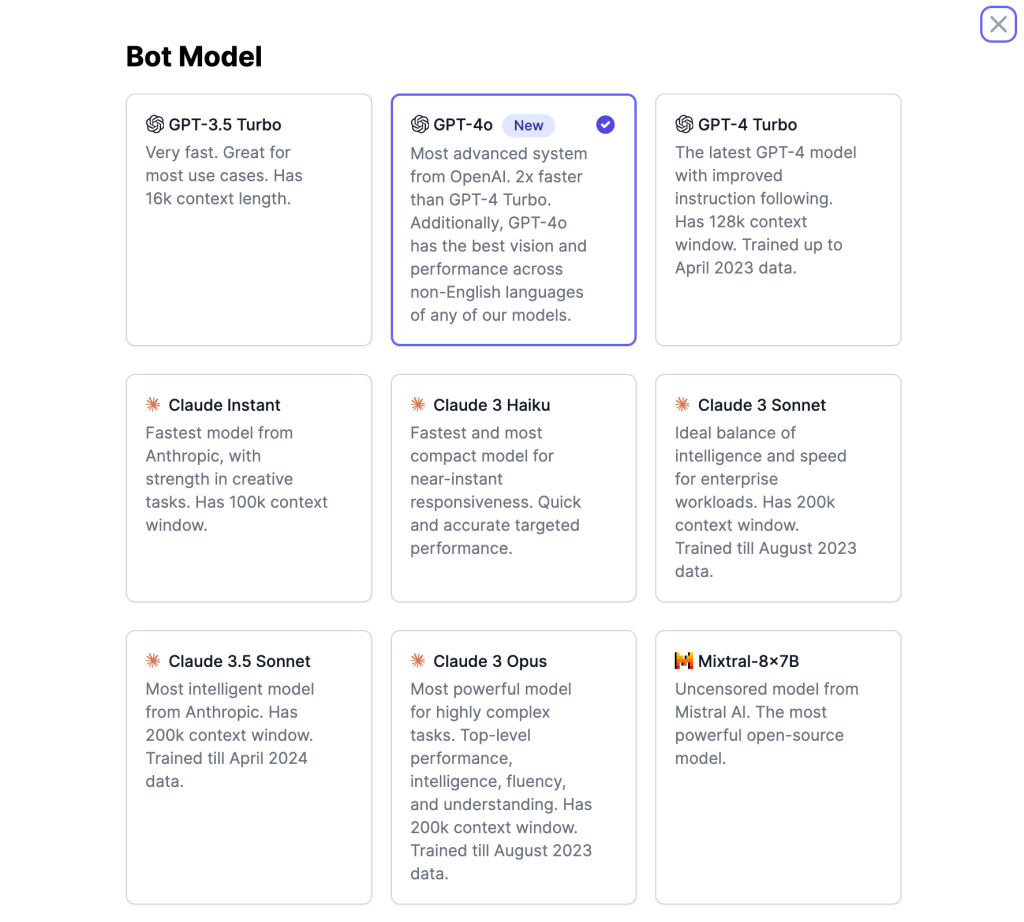
Claude 3 and Opus are other excellent options, especially if your focus is on more specialized tasks or niche applications. Claude 3 integrates well with various business processes, while Opus might be better suited for creative content generation. Llama 3 and Mistral, though less popular, offer unique advantages in specific scenarios, such as handling large datasets or performing complex computations.
Selecting the right model also involves considering the scalability and adaptability of your chatbot. For instance, if you aim to expand your chatbot’s capabilities in the future, choosing a versatile model like GPT-4o or GPT-4 Turbo might be more beneficial.
Ultimately, the best way to determine the most suitable AI model is by understanding your business needs and testing different models. Easy-Peasy.AI makes this process straightforward with its user-friendly interface, allowing you to experiment and find the perfect fit for your chatbot. This step ensures that your virtual assistant is not only efficient but also aligned with your business goals, providing a seamless and engaging experience for your website visitors.
Step 4: Connecting to a Knowledge Base
Connecting your chatbot to a knowledge base is a game-changer for enhancing its functionality and accuracy. Think of the knowledge base as the brain of your chatbot, filled with all the essential information about your company, products, and services. By connecting this database, your chatbot can provide precise and comprehensive answers to visitor inquiries. With Easy-Peasy.AI, this process is streamlined to ensure that even users with minimal technical skills can effectively set up their bot’s knowledge repository.
First, gather the resources you want to include in the knowledge base. This could be anything from your company’s logo, specific instructions for the bot, website crawl data, PDFs with testimonials, and any other relevant documents. These resources will empower your chatbot to answer a wide array of questions, making it a valuable assistant for your website visitors. For instance, if a visitor asks about your company’s history or specific product details, the bot can pull accurate responses directly from the uploaded documents.
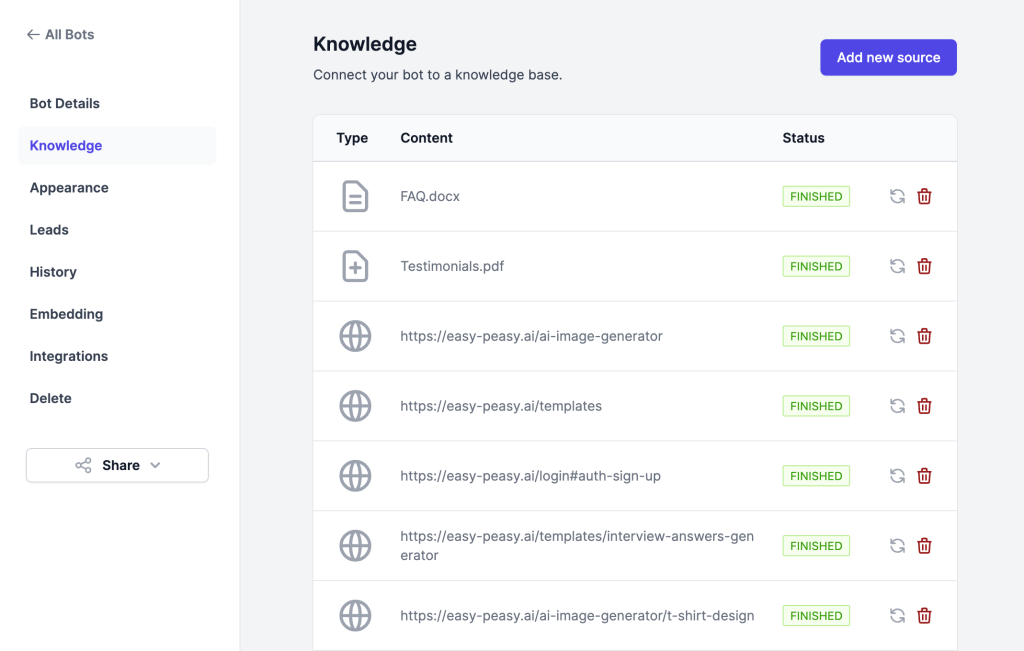
Once you have your resources ready, upload them to Easy-Peasy.AI’s platform. The interface is intuitive, guiding you through each step with clear instructions. Simply navigate to the knowledge base section, and start uploading your files. The platform supports various formats, ensuring you can include all types of content. Easy-Peasy.AI’s sophisticated AI will then process these uploads, enabling your chatbot to understand and utilize the information effectively.
After connecting the knowledge base, it’s crucial to keep it updated. As your business evolves, so should the information your chatbot relies on. Regularly update the knowledge base with new product details, company news, and customer testimonials. This ensures that your chatbot always provides the most current and relevant information to your visitors, enhancing their experience and building trust in your brand. By maintaining an updated knowledge base, your chatbot remains a reliable and efficient tool for customer engagement.
Step 5: Customizing the Bot’s Appearance
When it comes to creating a chatbot, appearances matter. There is a range of customization options to ensure your bot aligns perfectly with your brand identity. It’s not just about functionality; it’s about creating a cohesive user experience that feels like a natural extension of your website.
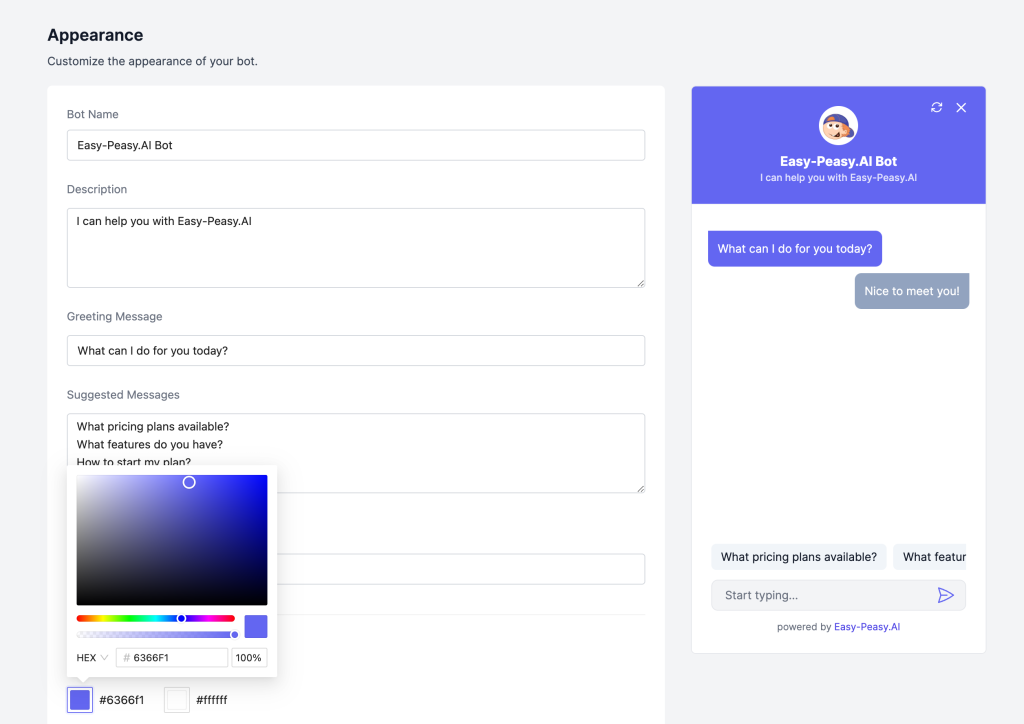
First up, let’s talk about the basics. You can give your bot a unique name and greeting message. This might seem simple, but it’s crucial for setting the tone of interactions. A well-chosen name can make your bot feel more approachable, while a friendly greeting can put users at ease from the get-go. It’s your chance to make a great first impression, so don’t underestimate its importance!
Color schemes play a vital role in visual branding. You have the power to customize the color of both the bot and human chat bubbles. This might seem like a small detail, but it can make a world of difference. By matching these colors to your website’s design, you create a seamless experience that feels polished and professional. It’s these little touches that can elevate your bot from functional to fantastic.
But customization doesn’t stop there. You have options to tailor the widget position, icon, and button color when embedding the bot on your website. This level of control ensures that your chatbot doesn’t just work well, but looks great doing it. By fine-tuning these elements, you can create a chatbot that feels like an integral part of your site, not an afterthought. Remember, in the world of user experience, details matter. You have the tools to make those details shine.
Step 6: Capturing Leads
In the digital marketplace, leads are the lifeblood of any business. With lead capture feature, this AI-powered assistant becomes a tireless salesperson, working around the clock to gather valuable customer information.
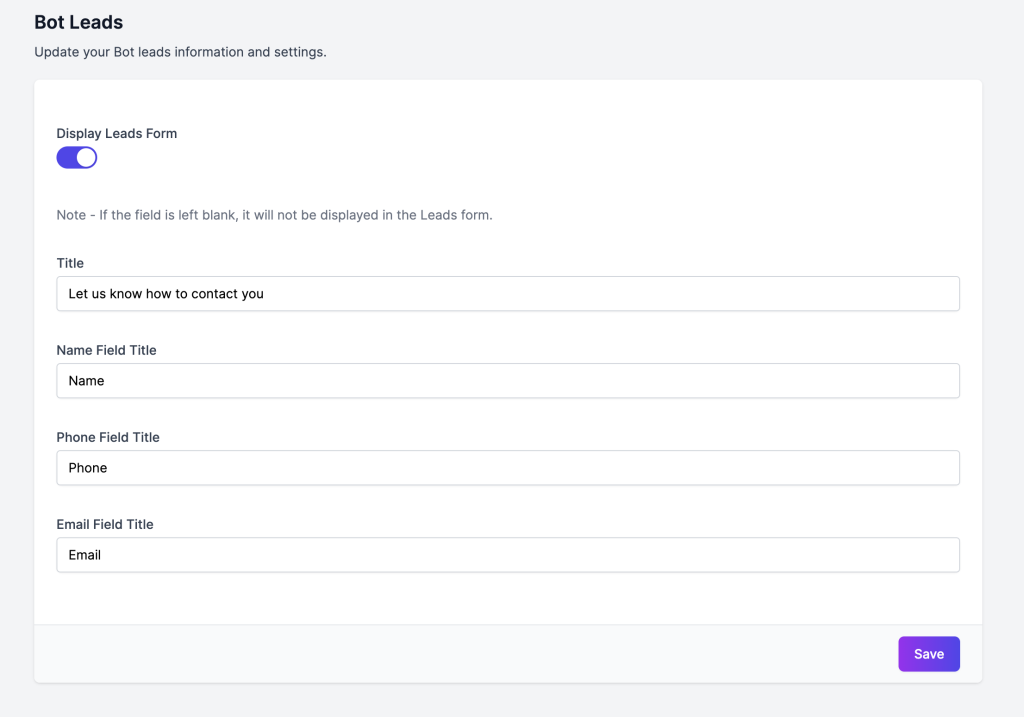
Setting up lead capture is a breeze. Users can customize the bot to request specific details such as email addresses, names, and company information. This flexibility allows businesses to tailor the data collection process to their unique needs. Whether you’re building an email list or seeking detailed customer profiles, the chatbot adapts to your requirements.
Step 7: Embedding the Bot
The final step in creating your custom GPT-powered chatbot is bringing it to life on your website. With just a few clicks, your AI assistant can be ready to engage with visitors.
To begin, the platform provides a simple script that you can copy and paste into your website’s code.
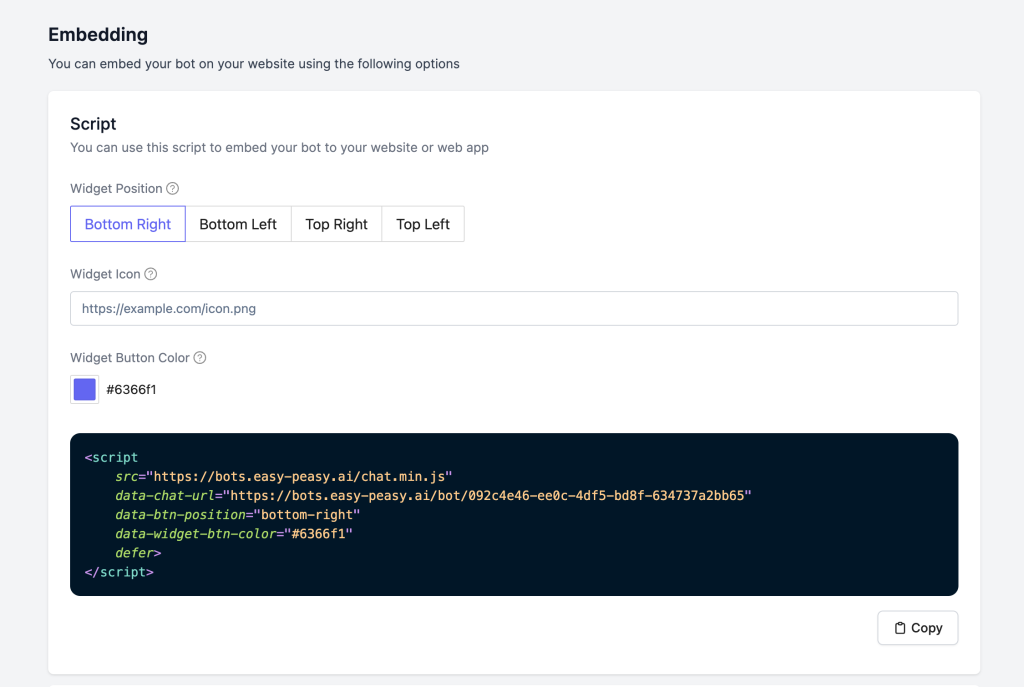
But what if you want to share your chatbot beyond your website? You can use the public URL for your bot (for example, https://bots.easy-peasy.ai/bot/75ceddfd-387c-4612-af18-0e35b9de1c92), making it easy to share across various platforms. Additionally, for those who manage blogs or other content platforms, you can use an iframe option. This versatility ensures that no matter where your audience is, your AI assistant can be there to help.
Step 8: Integrations
In today’s interconnected digital landscape, the ability to reach customers across multiple platforms is crucial. Easy-Peasy.AI recognizes this need and offers seamless integration options for popular messaging platforms. This feature extends the reach of your custom GPT-powered chatbot beyond your website, allowing it to engage with users where they’re most comfortable.
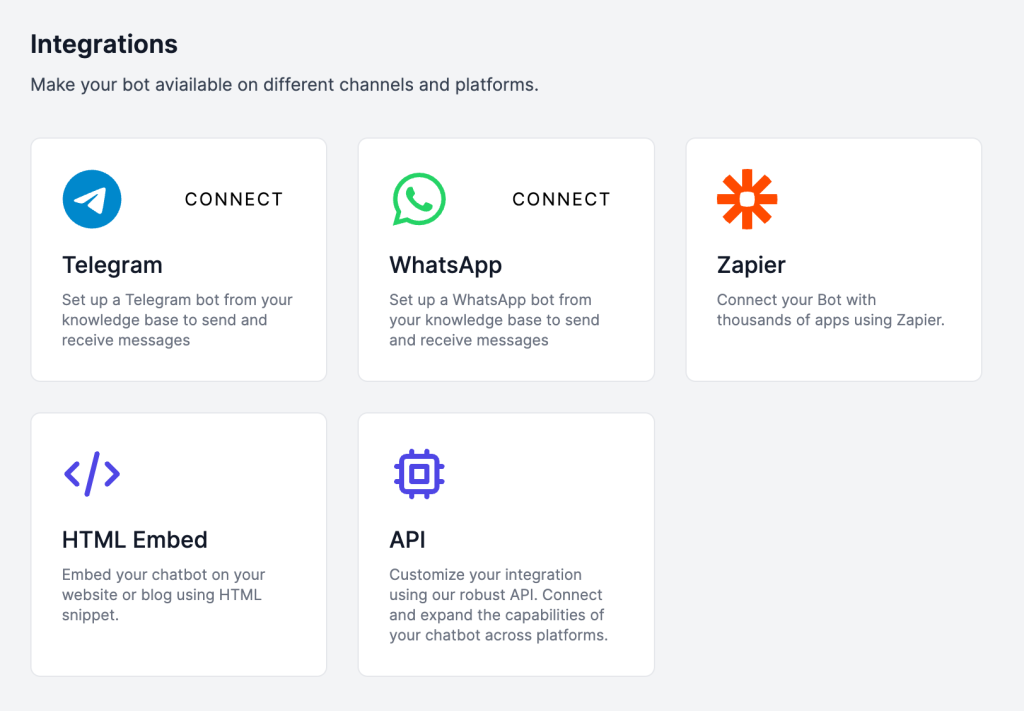
WhatsApp and Telegram, two of the world’s most widely used messaging apps, are at the forefront of integration capabilities. With just a few clicks, businesses can deploy their AI chatbot on these platforms, tapping into vast user bases and providing round-the-clock support. You can also integrate your Bot with 7,000+ apps on Zapier or have the custom integration using the Bot’s API.
Overview of Easy-Peasy.AI
Easy-Peasy.AI is a cutting-edge AI platform designed to address a wide array of business needs. Whether you’re looking to enhance your customer service, generate high-quality content, or improve operational efficiency, Easy-Peasy.AI has you covered. This platform comes equipped with over 200 AI tools, making it an incredibly versatile solution for businesses of all sizes. From its chatbot capabilities to its AI-powered image generation tools, everything is crafted to ensure simplicity and effectiveness, making advanced AI accessible to everyone.
Versatile Chatbot Options
One of the standout features of Easy-Peasy.AI is its advanced chatbot, named “Chat with Marky” which leverages not just GPT-4, but also integrates AI models from industry giants like Claude, Google, Meta, and Mistral. This multi-model approach ensures that your chatbot can deliver highly accurate and contextually relevant responses, significantly enhancing user experience. Whether your business operates in customer service, retail, or any other sector, the chatbot’s capabilities can be tailored to meet your specific needs.
Multilingual and Multifunctional
Easy-Peasy.AI’s features extend far beyond chatbots. For businesses aiming for a global reach, the platform’s AI Voice Generator supports over 40 languages, ensuring you can communicate effectively with a diverse audience. Additionally, the AI Transcription Tool shines in non-English languages such as Japanese, French, Italian, and various Slavic languages, making it an invaluable asset for transcription needs. If visual content is a priority, Easy-Peasy.AI’s Image Generator and Magic Upscaler can create and enhance images with striking detail and clarity.
Tailored for Business Needs
Beyond conversational AI, Easy-Peasy.AI offers specialized tools like the AI Interior Designer, which can craft exquisite room designs based on uploaded photos and specified styles. This feature is particularly beneficial for interior designers and real estate professionals looking to provide clients with visual concepts. With Easy-Peasy.AI, the possibilities are virtually limitless, making it an essential tool for businesses looking to innovate and stay ahead of the competition. Whether through enhancing customer interactions or refining business operations, Easy-Peasy.AI empowers you to harness the full potential of artificial intelligence.
Conclusion
Creating a custom GPT-powered chatbot with Easy-Peasy.AI is not just achievable for tech enthusiasts but for anyone eager to improve their online customer engagement. By following the steps outlined in this guide, you’ve learned how to set up your account, navigate through the bot section, describe your bot, generate its informational framework, choose the most appropriate AI model, and connect it to a knowledge base.
With Easy-Peasy.AI, the complexity of AI is distilled into a user-friendly platform that empowers businesses to harness the full potential of GPT technology. This chatbot can become your virtual assistant, working tirelessly to provide real-time assistance, answer queries, and enhance user experience on your website.
Imagine the impact on your business—greater customer satisfaction, increased engagement, and a streamlined workflow. As the digital landscape continues to evolve, tools like Easy-Peasy.AI are crucial for staying ahead of the curve.
So, why wait? Dive into the world of AI and watch your business transform. With this step-by-step guide, you’re well-equipped to create a powerful, custom GPT-powered chatbot that meets your unique needs. The future of customer interaction is here, and it starts with Easy-Peasy.AI.